Philippians 4:13

I can do everything through Him who gives me strength. Philippians 4:13

Monday, April 30, 2012

Rain by the Barrel

Last spring I up-cycled an old outdoor trash can that was no longer being used for trash. Actually, it hadn't been used for anything in years. I used it to catch rain water coming off our deck's tin roof to water the flowers and potted plants in the yard and on the deck. But I had one problem.

Mosquitoes. They really liked my rain barrel.

If I was going to continue to catch rain water to water our plants and help ease our water bill, I had to come up with a way to do it without also growing those pesky mosquitoes, too.


I decided to cover the top of the can with mosquito net, but I didn't want to have to remove the net every time I wanted to get water out of the can. So I installed a tap. Basically, it's a PVC straight valve, or something like that. I cut a hole in the can as small as it could be and still be able to push the valve through the hole, then I sealed around it on the inside and outside of the can with silicone. When I need water, I just turn the knob and water flows. The water pressure is not great, but it gets the job done.


I searched for mosquito netting fabric but my fabric store is currently out of stock, so in the meantime, I purchased 1 yard of tulle. I folded the tulle in half and used a bungee cord to secure it over the opening in the trash can. Water can get in, but mosquitoes should not. I hope. As soon as I am able, I do plan to replace the tulle with mosquito net.


I really love the idea that I can collect a little bit of rain and use it on a hot, parched day in the gardens. And just maybe I can do that now without the mosquito problem.

If I can get my hands on another old trash can, I'd like to make a second rain barrel. There's still a lot of water that just lands in those rocks.


The rain and snow come down from the heavens and stay on the ground to water the earth. They cause the grain to grow, producing seed for the farmer and bread for the hungry. Isaiah 55:10

Saturday, April 28, 2012

The Butterfly Garden Project

It's Spring, and we've been enjoying the outdoors as much as possible, despite high pollen counts. Because I know that once the Summer heat arrives, this Mama isn't going to want to play outside. I'm a wimp that way.

At my daughter's 2nd Grade Easter Egg Hunt at a classmate's grandmother's house, my daughter found a caterpillar and decided she would keep it. She carried it around in her Easter basket for what seemed a long time before finally losing it as she hunted for eggs. Probably a good thing. There was no way she could get it home alive. Caterpillars eat. It's what they do. And for the time it was in her basket, it wasn't eating.
To ease her disappointment, I surprised her (and her sister) with a Live Butterfly Garden kit. It arrived in the mail and we watched our tiny caterpillars grow into large caterpillars.
About 7 days after they arrived, the first one formed a chrysalis, and by the 10th day we had five of them.

As we watched the caterpillars grow and then waited for butterflies to emerge from the chrysalises, we talked about how we would have to release them. And it got me to thinking. What if we created a garden for them? Both of my girls LOVED this idea, and we found the perfect sunny garden spot, an existing garden that needed some new life.

To begin, I researched what plants caterpillars best like to eat, specifically those caterpillars that will become Painted Lady Butterflies, as those are what we were raising. I found that we should have Thistle, Mallow/Hollyhock, Alfalfa, and Pea in our garden. Adult Painted Lady Butterflies especially like Aster and Zinnias.

My initial search at local nurseries turned up empty. So we just started checking labels for flowers that attract butterflies in general and bought some various colors of Lantana, Verbena, Penta, and a Butterfly Bush to get us started. Then I hopped online and ordered Hollyhock and Aster to be shipped to me. Painted Lady Butterflies are common, so I figure once we release them, they'll find what they need to survive and reproduce, even if our garden is not completely ready.
The beginnings of our garden. The plants are young and small,
put perennial (most of them), so we hope in time it will
be a major butterfly hangout.
My research found that we should place rocks in our garden to give the butterflies a place to rest. A birdbath is not so helpful (even though we have one), as a butterfly cannot rest and drink in a standard birdbath, so we used a small terra cotta drain pan and placed a couple small rocks inside. Hopefully the butterflies will be able to rest on the rocks as they drink from the water. Not that butterflies really need our help to survive.
Once all of our butterflies emerged from their chrysalis, we had to wait several days before we could release them due to bad weather. We fed the butterflies with bits of fresh oranges, fresh cut flowers, and tissue soaked in sugar water.
Look closely and you might see four of our butterflies.
It was nice of them to open their wings for a photo op.
My daughter's second grade class raised butterflies from caterpillars earlier in the school year. She said that on release day they all took suckers, licked them, and touched them to their finger to get their finger sticky so the butterfly would be attracted and get on their finger. Then when the butterfly was ready, it would fly away.
A neighborhood friend came over and helped us release
our butterflies.
 
My oldest daughter and her friend each held a butterfly for about a minute, or so it seemed. My younger daughter's butterfly was more excited about freedom and flew away immediately, not even sticking around for a photo op.

This has been such a fun project to do together. And it continues, because even though our butterflies are gone, we will be working in our garden, watching it grow, and hopefully seeing butterflies and caterpillars able to enjoy it.


Therefore, if anyone is in Christ, he is a new creation. The old has passed away; behold, the new has come. 2 Corinthians 5:17


Thursday, April 26, 2012

Button Bug Planters

I just have to share this absolutely adorable garden craft we did with our class of 1st and 2nd graders on Wednesday night. We have been learning about Botany in our Caravans class, so this was our hands on project... Button Bug Planters.
Aren't they adorable?
For this project you need:
  • empty, clean grape tomato containers
  • buttons
  • googly eyes
  • colorful craft wire
  • colorful sharpie markers
  • dirt
  • seeds
  • Extra tools: glue, sharp needle and needle-nose pliers
Glue small googly eyes to the buttons and decorate
them to look like various bugs.
Use a sharp needle to poke holes in the container in the places
you would like to place your bugs. Use the button holes
themselves as guides for poking the holes.
You don't want to get them too close together or you
may rip the plastic between the holes with the next step.
Cut small lengths of wire, bend in half, and feed up through
the holes from the inside of the container. Then feed the button
on the wires and twist them together. Use a pair of
needle-nose pliers to form the wires into buggy antennae.
Use the sharpies to add legs and wings by drawing on the
container around your bug.
Bugs can be placed on the top and sides of the container.
Add dirt, seeds, and a little water. Remember, the container
does have holes around the sides, so be sure to place your
container on something to catch water that may leak out.
You can leave the lid closed until plants start to sprout, then you will need to keep it opened for plants to grow. When they're big enough, transplant them into the ground.

The kids had a blast, and we finished the project in about an hour.


You therefore, beloved, knowing this beforehand, take care that you are not carried away with the error of lawless people and lose your own stability. But grow in the grace and knowledge of our Lord and Savior Jesus Christ. To him be the glory both now and to the day of eternity. Amen. 2 Peter 3:17-18
 

Friday, April 6, 2012

Nature is our Canvas

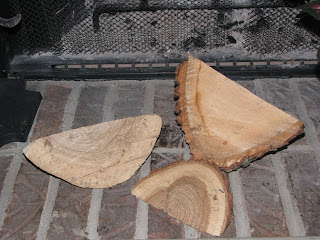
A few weeks ago we had a large oak tree cut down. Part of it was dead and with every storm we held our breath that it might not fall. When the work crew left, we had a huge pile of mulch left from the stump, so the girls and I went out to spread it around to some of the other gardens in the yard. As we worked, we found some wedge pieces that we decided would be perfect for painting.

My oldest daughter is very sentimental about things like this, wanting to keep leaves and branches and other odd things to "remember" it by. This seemed like the perfect way to help her do that and enjoy a fun art project, too.
Three rescued wedges.
To start, I sealed the wood with Kilz. I worked on this
several days in advance so it would be dry and ready
when the girls were ready to paint.
My oldest thought the wedges looked like watermelon,
so that's what she painted on her piece.
My youngest also painted a watermelon on one side of her
wedge. On the other side of her wedge she painted an ocean scene.
I think she likes her ocean best. She also ripped all of the bark from her piece.
I painted a flower on one side of my wedge, and in this
photo you can see my younger daughter's ocean scene.
I painted a tree on the other side of my wedge.
Now each wedge will just need some clear sealer to protect our art. What a fun day of painting we had, and except for the brushes and paint that I already had in the closet, it didn't cost us a thing... well that is if we don't talk about what it cost to take down the tree in the first place.


Blessed is the one who does not walk in step with the wicked or stand in the way that sinners take or sit in the company of mockers, but whose delight is in the law of the LORD, and who meditates on his law day and night. That person is like a tree planted by streams of water, which yields its fruit in season and whose leaf does not wither — whatever they do prospers. Psalm 1:1-3