Philippians 4:13

I can do everything through Him who gives me strength. Philippians 4:13

Wednesday, May 30, 2012

Craft Review: Martha Stewart Sponge Balls

Today the girls and I needed a little cooling off, so we made Sponge Balls, or Sponge Bombs as we prefer to call them.


I found the idea on Pinterest, originating from Martha Stewart. I followed her instructions in making our sponge bombs, but after trying them out, I felt they needed a bit of improvement. So my instructions include the improvement.

To make one ball, you will need 3 standard kitchen sponges,
the kind without the scrub surface. We're making 2 balls.
Using a pen and ruler, draw lines lengthwise on each
sponge, 1/2 inch apart.
Cut along the lines. Each sponge will yield 6 strips.

It's best to use new sponges, as they are easier to cut if they are straight from the package. And clean Sponge Bombs just seem like a good idea.

The next steps feature my improvement...

Take 6 strips. Lay 3 of them on the table, with 3 more on top
in a two layer stack. Then tie a string around at the center.
Tie as tight as you can. Do the same with the other strips
so that you will have 3 bundles.
Then tie all three bundles tightly
together to make a ball.

Martha's instructions have you tie all 18 strips together at the same time. It was harder to get a tight tie with the string, and as we played, pieces of sponge from the center of the ball kept trying to come out, and eventually did come out, causing the whole thing to start to fall apart.

After we were done playing, I remade them using my improved assembly. It has not been fully kid-tested, but I did take them outside and hit them several times against the door, and so far they seem to be a little more durable and ready for our next battle, because the originals started to fall apart after only a few hits.


I discovered that it is way more fun to aim Sponge Bombs at Mom, so be prepared to get wet, too. And they are far more forgiving of bombs returned from Mom than those coming from each other.

Most definitely fun, and they do last longer than water balloons, and consume less water than the sprinkler. And hopefully with my improvement, we can get a few more times of water fun from them.


But whoever drinks of the water that I will give him will never be thirsty again. The water that I will give him will become in him a spring of water welling up to eternal life. John 4:14 

Tuesday, May 29, 2012

The Lace Crown Project

My cousin recently asked me if I could make some crowns for her. She showed me a picture of one similar to what she was looking for. So today I've set out making crowns.


I purchased pieces of lacy trim, that when formed into a circle would look like a crown. I also purchased fabric stiffener and silver glitter fabric paint. I would later need to also get grey fabric paint, because the silver glitter paint was just glitter, and I ended up with a white glittery crown.


I needed to make 3 crown sizes, adult/large child, small child/toddler, and infant. So I cut 20 inches for the large, 17 inches for the medium, and 14 inches for the small. I formed them into a circle with a small bit of overlap and stitched them together.


For the large crown, I covered my "head model" in plastic wrap to serve as a mold to make the crown shape. I put some of the fabric stiffener into a baggie and worked the stiffener through the lace until it was saturated. Then I pressed out the excess with my fingers and placed the crown on the head, upside down so the points would dry straight.

As it dried, I tried to keep the excess drips cleaned
so they wouldn't pool at the points.
When it was dry, I removed it from the mold and painted it
grey, then painted on a layer of the glitter paint.

Before I added the other two crowns to the stiffener, I mixed in the grey paint and the glitter to the baggie. This tinted the color of the stiffener and when it was dry, it would already be painted.

I used my blender as a mold for the smallest crown,
covered in plastic first, of course.
The finished small crown.
I used a bowl for the medium crown. The cool part about this
one is the shape of the bowl gave the crown a flared out look.
The finished medium crown with the flared points.
I also found some gold lace. I didn't have to paint or
glitter this one because it was already gold with
glitter flecks. Perfect for a crown.
This trim piece was already silver, so I didn't have to paint
this one either. This crown might be perfect for a Prince.


And now the prize awaits me—the crown of righteousness, which the Lord, the righteous Judge, will give me on the day of his return. And the prize is not just for me but for all who eagerly look forward to his appearing.  2 Timothy 4:8

Saturday, May 26, 2012

Carpenters We Are.... Not

Our neighbor, who works at Lowe's, recently gave us a couple leftover building kits from those Saturday workshops Lowe's puts on for the kids. So today the girls and I built some Bug Barns.


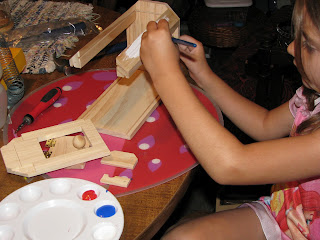
These kits are pre-cut and ready to assemble, with little drill holes in the places for screws. Seems easy enough. Right? But my girls found it difficult to hold the wood pieces and work the screwdriver, all the while giving enough force to actually turn the screw. Mommy did most of the building.

My younger was able to screw the hinges into the door
of the barn, because she could use the table for
a little extra leverage.

My oldest wanted no part in using the screwdriver. 

When we had the barns half assembled, we decided to take a break from building... and paint. Now painting... my girls can do that!

When the paint was dry, we - and by we, I mean I -
finished the assembly.

As dusk approached, we took our new barns out to find occupants. Fireflies. One of the favorite parts of summer time.

The neighbor girl joined in the fun.
The fireflies were out in force tonight, and we had at least
20 in this one barn at one point.

All in all it was a hot, lazy Saturday. We stayed indoors and enjoyed our building and painting project. 

Then most definitely enjoyed catching fireflies before bedtime.


You, O God, are my king from ages past, bringing salvation to the earth. Both day and night belong to you; you made the starlight and the sun. You set the boundaries of the earth, and you made both summer and winter. Psalm 74: 12, 16-17

Saturday, May 19, 2012

Birthday Party Paint Studio

My oldest will officially turn 8 in about an hour. I'm not sure where these past 8 years have gone. Wasn't it was just yesterday we were checking into the hospital? Just yesterday I met her for the very first time, so tiny and new?

Now she's 8. And today we celebrated with a Paint Studio Party.


I looked into having a "professional" painting party, by either bringing one to our house, or having it at a different location, but we just couldn't pull off the cost of that kind of party. So we had our own. I personally have never attended such a party, so I really had no clue what I was doing, and we just made it up as we went along.


Before the party, I purchased a small 8x10 canvas for each guest and drew the same picture onto each one, and I made one for myself, too.


I set up the tables so each child could see my canvas on an easel (which is off to the right of the photo), with the idea that we would paint together. But once we got going, the kids just took off painting their pictures and had a great time.

I used egg carton cups so each child could have access to
their own individual paint.

I had everyone start their paintings by coloring the background blue. We all did that part first. From there they could choose any color for the vase and flowers, and of course green for the stems and leaves.

We had one boy in our group, and I didn't
think he would want to paint flowers,
so I drew a dinosaur for him to paint.


Our finished masterpieces, each one unique. Some chose different colors for each of their flowers, some chose to decorate their vase. They may have started out with the same canvas, but they each ended with something as different as each one of them.

I decorated the cake to match our paintings

All in all, it was an easy party. I think I could have skipped the whole idea of a class/instructor set-up and just let them paint. Maybe I could even have skipped drawing a picture on the canvas and just let them free hand it and paint whatever they wanted. 

Don't think that you have to be an artist to have a Paint Studio Party. You just need to provide the canvas, the brushes, and the paint. The kids will do the rest.


Happy Birthday, baby girl. I love you so much and I'm so proud of who you are becoming.


For we are God's masterpiece. He has created us anew in Christ Jesus, so we can do the good things He planned for us long ago. Ephesians 2:10 


Tuesday, May 15, 2012

Craft Review: Glossy Paper Flowers

I teach Sunday School to a small class of 1st and 2nd graders. We've been studying The Ten Commandments, and I thought it quite appropriate that on Mother's Day our lesson just happened to be on the 5th commandment ... Honor Your Father and Mother.


After our lesson, we spent a little time making some flowers for Mom. I found this idea on FamilyFun.com and it was a perfect activity for our class. It took us about 30 minutes to each make one flower, though I think they would have been perfectly happy to spend longer and make more.

You'll need old magazines, scissors, paper fasteners, glue stick, and an old CD for a circle template.

Look for colorful pages in the magazines and cut circles using
the CD as a template to first draw the circle.

Fold the circle in half, then the half in half,
and then in half again...

...then cut the large end of the remaining wedge into the round
or pointed (or both) shape of a single flower petal.

When you open the circle back up, you'll have a
flower with symmetrical petals.

Cut several circles, fold them, and cut petals with different
shapes and sizes each time, opening up the circle
to see the different flower shapes that result.

Tear out a full sheet from the magazine and roll it up into
a thin tube to make a stem. Use a little glue to
seal the tube. Then stack your favorite flowers on
top of each other with the largest ones in back to the smallest in
front and fasten them together and to the stem with a paper fastener.


The kids in my class seemed to struggle with the concept of folding up the circles and cutting the design, and most of them asked me to draw the pattern necessary to make a certain kind of flower, which I did. They enjoyed looking for pages to cut and making a mess, and it was fun to see them open up the circles to reveal the shapes of their flowers.

And of course they were excited to share their very unique,
pretty flowers with their Moms.


Honor your father and mother. Then you will live a long, full life in the land the LORD your God is giving you. Exodus 20:12

Monday, May 7, 2012

Color Ink Coasters

I saw this idea on Pinterest not long ago, and I thought these coasters were so beautiful and unique. The girls and I have some special gifts to give in the next few weeks, so we decided to make something special instead of buying some trinket to give.


So we spent a little time this weekend playing in alcohol ink to make these very unique drink coasters from ceramic tiles. Both of my girls just loved this activity, and it was super easy, too. I think I might need to pick up a few extra tiles and have them make some for their Mama, too!

You'll need white ceramic tiles, different colors of alcohol ink,
alcohol blending solution, and water based sealer/varnish.

You'll find the Adirondack alcohol ink and blending solution in the stamping section at your local craft store.

First, coat your tile with the clear blending solution.
Then start adding drops of ink.
We used a straw to blow and diffuse the ink.
Doesn't it look like silk?

You can add a second color while the first color is still wet, or wait until the first color is dry, and the results will be a bit different with each method. Add as many or as few colors as you like. The possibilities are endless and each tile will be unique and different. The ink does start to dry pretty fast, especially if you're blowing on it with a straw. 


I personally didn't have much success with mixing colors while still really wet because they just turned into a black murky mess for me. When that happened, I just added more blending solution and washed the tile off and started over. I really tried to not do that too many times.

My older daughter using the straw to diffuse the red ink.
My younger daughter used the tip of the ink bottle to just
push the ink around. Her pattern is looking like flowers.
These tiles are ready for a clear sealer/ varnish.

First, I tried a sealer that needed to be painted on with a brush. Even though I allowed the ink to dry overnight, the act of brushing on the sealer smeared and streaked our ink. So I had to wash that tile off with the blending solution and start over with it.

I happened to have in my craft closet a can of spray varnish sealer and with it was able to apply the first coat without messing up the ink designs. I plan to add several more coats, allowing to dry well in between each one, before I declare them ready for use.

I absolutely LOVE these coasters, especially the ones the girls made. I hope the gift recipients love them, too. We really enjoyed making them.


For we are God's workmanship, created in Christ Jesus to do good works, which God prepared in advance for us to do. Ephesians 2:10