Philippians 4:13

I can do everything through Him who gives me strength. Philippians 4:13

Saturday, February 11, 2012

Craft Review: Crayon Heart Valentine Card

If you're on Pinterest, you've probably seen this Crayon Heart Valentine Card idea. It's also at FamilyFun. My girls and I made these together for their class Valentine Card exchange. It's a great way to recycle those well used and broken crayons you have hiding in a box.

You need crayons... I found that it's best to choose a variety of lighter colors (lime green instead of hunter, sky blue instead of navy, etc) and go easy on blacks and other really dark colors. You also need some cardstock, double-sided foam tape, and a heart-shaped mini muffin pan. I found a silicone pan at Joann's.
Remove the paper from the crayons and chop them into small pieces and put them in the pan cups, about 1/2 to 3/4 full. Place them in a 230-250 degree oven for 10-15 minutes. Meanwhile, cut 3-inch and 3-1/2 inch circles from cardstock and glue the smaller circle to the larger circle. Write your Valentine message on the front and your "To/From" on the back. When your crayon hearts are cool, use the double-sided tape to attach the heart to the center of the card.
We had a bit of difficulty with attaching our hearts... our tape was too thin and we had to double up, even triple up the pieces to make it thicker. I guess I didn't find the right stuff.

Message ideas include:
  • You color my world
  • Valentine, you make my heart melt
  • Have a happy Valentine's Day, for "crayon" out loud! 
My daughter thought the third message was hilarious. She personally wrote all the messages on her own cards. I wrote the messages for my younger daughter, and she wrote the name of her school-mate and signed her own name.

Of course, recipients can color with their new heart shaped crayons, and they'll be surprised by the colors that comes from it.


"For the Lord is good. His unfailing love continues forever, and his faithfulness continues to each generation." Psalm 100:5

Wednesday, February 8, 2012

Wax Valentine's Hearts

I searched the world of Pinterest for a Valentine's craft for our Wednesday night Caravan class of 1st and 2nd graders... something that was NOT making Valentine's cards. I found these cool looking wax hearts for a unique window decoration.
Gather up some crayons, a manual pencil sharpener, wax paper, craft paper (to protect surfaces), iron set to medium heat, card stock heart templates, Sharpie, scissors, string, and clear tape.
Put down a piece of craft paper on your ironing board to protect it. Tear off a square of wax paper and fold it in half making a good crease in the paper. Open it back up and shave crayons onto the paper. Gather the shavings in a thin layer in the center and close the wax paper at the fold over the crayon shavings.
Place another piece of craft paper on top of the wax paper and iron on medium setting until the wax melts into a thin layer within the wax paper. Allow a couple minutes for it to cool.
Place a heart shaped card stock template and trace around it with a black sharpie. You can make your own template, or use this one from FamilyFun.
Cut out the heart, cutting along the inside of your traced lines because you don't want to see the Sharpie lines when you're finished.
Tape a piece of string to the heart and hang it in the window. Just remember that this IS made of wax, and if you hang it in a window that gets direct sun, it could melt.
Last night, my daughter helped me test this project before we take it to Caravan class tonight, and she loved it. Since we made them after dark, we couldn't get the full effect because holding them up to the kitchen light just didn't do them justice. It was fun to see them hanging in the window this morning.


My daughter memorized this verse in her Caravan class this year:  

Stand firm then, with the belt of truth buckled around your waist, with the breastplate of righteousness in place, and with your feet fitted with the readiness that comes from the gospel of peace. In addition to all this, take up the shield of faith, with which you can extinguish all the flaming arrows of the evil one. Ephesians 6:14-16

Friday, February 3, 2012

Make a Flying Jelly Fish

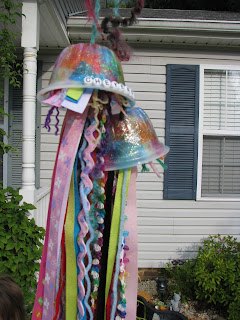
I'm digging back through some old craft projects from before I started blogging about our fun, so I can share those with you, too. During the summer of 2010, the girls and I made some fun jelly fish using scrap ribbon, yarn, and recycled snack containers. Oh, and glitter. I'm pretty sure this idea came from FamilyFun Magazine, but I cannot locate the original article to pinpoint a specific issue. If I come across that, I will update this blog.


Items you will need:
  • Clearish plastic snack cup, like the individual applesauce cups, clean and dry
  • Scrap pieces of yarn and and/or ribbon.
  • Selection of colored tissue paper torn into small pieces
  • Glitter
  • Clear white glue (watered down) or Mod Podge.
With a paint brush, spread a layer of glue on the inside of the cup and sprinkle in a little glitter. Lay the torn pieces of tissue paper inside to cover all the glitter and glue. Brush on a little more glue making sure to cover and wet all the paper. Add more glitter if desired. Let dry.

Here's a cup decorated with just glitter. So you can skip
the tissue paper if desired and just use a lot of glitter.
You want to completely cover the inside of the cup.
Cut varying lengths of ribbon and yarn, as many pieces as you'd like
your Jellyfish to have. We used 25-30 pieces at 12-15 inches long.
We tied random knots onto the ribbons, just to make it more interesting. You could also add some colorful or sparkly beads above those knots for a little extra bling.

With another length of yarn, tie the strands all together about two inches from the top.
When the glue is dry. Use a nail to punch a hole in the bottom of the cup and
thread the piece of yarn that's holding everything together through the hole.
We also added some small letter beads to the rim
of the cups to spell their names and
personalize their projects.
The girls loved making these jelly fish, and occasionally my oldest will ask to revisit the project to make more.


The Lord gives wisdom and from His mouth come knowledge and understanding. Proverbs 2:6