Philippians 4:13

I can do everything through Him who gives me strength. Philippians 4:13

Thursday, June 30, 2011

Craft Review: Family Fun "CD Spinners"

I really wanted to do a Fourth of July craft for you. I guess I have never actually done one with my girls. I found this craft for CD Spinners in the June/July 2010 issue of Family Fun Magazine, but it's also currently at familyfun.com as a Fourth of July craft idea. The CD Spinners they show are red, white, and blue in true patriotic fashion. But, alas, the ones we made tonight are not necessarily patriotic. They're just fun. So this craft can be done anytime, and the way you color it makes it patriotic or not. You could make them for Christmas, or Halloween, or whatever holiday or mood suits you.

You will need old CDs that you do not intend to ever use again
as a CD, large shooter marbles, plastic bottle caps, and glue.
At familyfun.com, you can download templates to use with swirly designs that will look really neat when it's spinning, but I found these templates to be too small. They didn't completely cover whatever was already on the face of our CDs. So we made our own templates by placing the CD on our card stock paper and tracing around the outside as well as the inner circle. Then we drew and colored our own designs, which will probably not look as cool while spinning. Oh well.

Once you have your template, create and/or color
your design.
Then cut it out. Don't forget to cut out
the inside circle, too.
Glue your design to the face of the CD. We just used
a regular glue stick.
Glue your marble to the other side of the CD, in the hole.
We used E-6000 glue. Family Fun recommends
Crafter's Pick The Ultimate. You'll have to let these glues
dry overnight. Or you can hot glue it for
faster results.
Glue your plastic bottle cap on the top center. I used the
E-6000 here, too.
Let your glue dry, how long depends on your glue. Then give it a spin! Mine works great, even after only a couple hours to dry. My girls love to draw, so they enjoyed creating their own design. And they'll love spinning, too, when they get up in the morning.

Gran... the frog one is for you.


"You are worthy, our Lord and God, to receive glory and honor and power, for you created all things, and by your will they were created and have their being" - Revelation 4:11

Saturday, June 25, 2011

Flower Makeover

My sweet neighbor gave these silk flowers to me when she
heard that I was making flower hair accessories.
But the clip to which they are attached made them
unsuitable for hair. I did attach one once to my little one's
baseball-style cap, and that was cute. But I couldn't
do much else with them.
So I took them apart. GASP!
I even took the center part off its green plastic piece.
I used a brad and inserted it through the center hole of
each piece, putting the flower back together.
Brad sticking through to the bottom of the flower.
I opened the brad and put a dot of hot glue in the center,
then placed on it a hair pin with pad that I found at Hobby Lobby.
With a pair of needle-nose pliers, I curled the ends of the
brad around the hair pin pad.
I hot glued the yellow center back in place, covering
the head of the brad.
Now these flowers are ready for hair.
Or I kind of like it here on her dress.
I just slid the hair pin on from the
edge of her dress. Perfect!


Don’t be concerned about the outward beauty of fancy hairstyles, expensive jewelry, or beautiful clothes. You should clothe yourselves instead with the beauty that comes from within, the unfading beauty of a gentle and quiet spirit, which is so precious to God. 1 Peter 3: 3-4

Thursday, June 23, 2011

Craft Review: Family Fun Magazine "Keep It Under Your Cap"

As soon as I saw this Recycling Craft last year in Family Fun April 2010, I started saving up bottle caps and looking for little embellishments. Since then we've done this project several times making both magnets and necklaces. We made some more yesterday, so I thought I'd share this fun project with you.


You'll need undamaged bottle caps (we use the twist-off ones from bottles of IBC Root Beer), decorative paper, packing tape, tacky glue, clear sealant, button magnets, and embellishments...jewels, sequins, rhinestones, beads, brads (with the brad part removed), small stickers, googly eyes, etc.

To begin, cut a 1" circle from your paper and cover both sides with
clear packing tape. Then cut it out again. The tape protects the paper
from discoloring over time.
I used my 1" circle punch. If you don't have one, you can use a quarter as a template. Glue your paper circle inside the cap. Now, add your embellishments. Just use a bit of tacky glue to keep everything in place as you work. I use an old pair of tweezers to help arrange everything like I want it, because my fingers always seem to get in the way. Now if you do bring out the tweezers, you might need one for each child, as that will be their favorite part.

The scrapbooking section of the craft store is a great
place to find fun little embellishments.
Once everything is in place and the glue is dry,
brush on a generous coat of clear sealant. I used
Collage Pauge Instant Decoupage Glossy.
I use a small paint brush to spread the sealant into all the little pockets that can be created by the various embellishments. Allow to dry overnight.

Finally, add a button magnet with tacky glue,
or use E-6000 and add a necklace bail plate.


May the words of my mouth and the thoughts of my heart be pleasing to you, O Lord, my rock and my redeemer. Psalm 19:14

Friday, June 17, 2011

Don't Forget Father's Day

Father's Day is this Sunday, June 19. At our house, we've never purchased big gifts for Dad for Father's Day (or for Mom for Mother's Day). All the retailers out there try to make us think that's how you tell someone you love and appreciate them, with an expensive gift. But around here, we just like to spend the day together, as a family, even if it's just doing the same thing we do every Sunday. 

Since we're too far away to spend the day with my Dad, he'll get a card in the mail and a phone call. And this will be the first Father's Day without my Father-in-Law. But I do want our daughters to be able to tell their Daddy how much they love him in some special way, and that's usually by making something for him. 

I think my personal favorite thing we've done for Father's Day, was the year we made him a t-shirt. I used a little fabric paint and we put the girls' hand prints on the shirt under the word "Daddy". It's still one of his favorite shirts to wear around the house.

Then one year I found some greeting cards that were much sturdier than the average card. The inside was a picture frame. I bought two of them. In one card, I put a picture of him with our oldest and in the other I put a picture of him with our youngest. They are still displayed in his office at work. Though we didn't actually make something that year, the pictures and the memory they represent are priceless.

This year I found tiny paint canvases and easels at Joann's. Yesterday they painted tiny masterpieces for him. Today we'll make him some cards. I love the age they are now because they love to make things, and he knows they spent time and put thought into what they made. And they did it just for him.

That's worth so much more that any gift we could buy.


See what kind of love the Father has given to us, that we should be called children of God. – 1 John 3:1

Tuesday, June 14, 2011

Craft Review: Family Fun Magazine "Most Fun T-Shirt To Make - Reverse Stencil"

Most of the time I just skip crafts involving t-shirts. But this one from the June/July 2011 issue of Family Fun Magazine caught my eye. So here's what we learned about making a Reverse Stencil T-Shirt.

You need a plain pre-washed t-shirt, contact paper, fabric paint,
and a water spray bottle.
Make a template
Your template needs to be big. Mine filled up as much as possible of a standard sheet of paper. I looked for the perfect free templates online, but I ended up modifying what I found and drawing my own custom template. Another idea is to have your child draw something for his/her shirt.

Trace your template onto the contact paper and cut it out.
Put a bit of cardboard inside the shirt so the paint doesn't bleed
to the back of the shirt. because it will, trust me.
I just cut up a box for my insert.
Peel the backing from the contact paper and adhere it to the shirt
wherever you want your design to be. Make extra sure the contact paper is
securely attached, especially around all edges, with all bubbles pressed out.
In your spray bottle, mix three parts fabric paint with two parts warm water and shake. Make sure you have plenty of newspaper to protect your work area, because this will spatter. We took ours outside for the next step.

Spray the paint all around the stencil.
Yes, my children are in their PJs.
According to Family Fun, a light spray is less likely to seep under the stencil. Unfortunately, both of my spray bottles shot out in a hard stream, and I couldn't get them to adjust to a nice easy spray. So I definitely had seepage. 

And because my spray bottles were not cooperating with us,
we used a paint brush to spread out pools of paint that were
collecting on the shirt.
I think we used a bit too much paint. If your spray bottle
can spray lightly, you can get a nice even coverage
without all the pooling, and perhaps with less paint.
So how did they turn out? This one did okay. Yes, it had seepage
but not so much that it ruined the design.
This one did not turn out at all. The owl lost his eyes and beak,
as well as the space between his face and outside lines.
Tree branches were lost too. This one was not okay.
So we got some shimmery pink fabric paint and painted him in,
and now it's okay.
In following the directions on the the paint, we must wait 72 hours before we can wash the shirts, and I'm hoping the washing will relax them a bit because they're both pretty stiff right now. Again, I'm thinking we put on too much paint. All in all, it was a fun activity for my girls, and I know they will enjoy wearing their new shirts. They enjoyed deciding what we would put on their shirts. I made the templates and got the shirts ready for them to spray. And they enjoyed the spraying. I just wish my spray bottles had worked better than they did. Maybe next time.


For I know the plans I have for you,” says the Lord. “They are plans for good and not for disaster, to give you a future and a hope. In those days when you pray, I will listen. If you look for me wholeheartedly, you will find me. I will be found by you,” says the Lord. Jeremiah 29:11-14

Thursday, June 9, 2011

It's for the Birds...

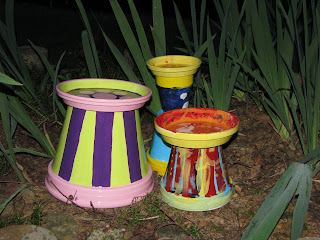
I've seen the idea of using a Terra-cotta pot for a bird bath in many different places, but most recently at Dad and Susan's house. Susan made one and had it in the garden, and I guess seeing one for real in a garden made me start to think this was something my girls and I could do together. I tried to plan it so that ours could be one unit made up of several parts, so this is what we did. You can build yours however you like. You can even be like me and stack pots together in the Terra-cotta isle at Michaels until you have the perfect arrangement (or Wal-mart or wherever you choose to purchase your pots). For ours, I purchased one large pot and tray, one medium pot and tray, one smaller pot and tray, plus one extra medium pot.

I coated each pot, inside and out, with a coat of Kiltz
Premium Interior/Exterior.
My older daughter painted the smaller pot along with the extra medium pot. She chose to do an ocean theme. My younger daughter painted abstract art on the medium pot. And I painted the large pot in modern decor style, I guess you would call it. We used acrylic craft paint.

For my pot, I used wide masking tape so that I could make stripes.
I painted light green between the lines of tape.
I removed the tape before the green paint was completely dry so that I would not peel off any of the paint along with the tape. Then when the green paint was dry, I painted purple in between the stripes of green, just being careful to paint inside the lines. Then I painted some pink on the rim of the pot, and painted the tray with those same colors.

I wanted a design inside the tray, as this would become the
bird bath, so I used two sizes of jar lids to make circle templates.
Then I filled in the circles.
Here's my section of our bird bath.
Work in progress, the girls loved painting their pots.
My older daughter's ocean themed section.
The medium pot is the bottom base, with the smaller
pots stacked on top to make it taller than the rest.
Her ocean theme has yellow sand at the bottom, with the light blue ocean, darker blue sky, and yellow sun. After I took this picture, she added more detail in her ocean, sky, and sun.

The abstract design of my younger daughter's section. She,
too, added detail after I took a picture.
After everyone was finished painting and happy with their results, I added three coats of gloss exterior/interior varnish. This part is pretty important, especially if you plan to place your bird bath outside, which is the logical place for it. I also glued the tray to the base using E-6000 craft glue.

The final look of how they are set up in the garden.
Close up of the finished Ocean bird bath.
I love the bird and clouds she added to the sky,
and the sun she painted inside the tray.
Close up of the finished abstract bird bath. I personally am incapable
of mismatched
and random. Even though I cannot create abstract,
I do like what others can create. I really love how hers turned out.


"And God said, 'Let the water teem with living creatures, and let birds fly above the earth across the vault of the sky.'" Genesis 1:20

Saturday, June 4, 2011

Craft Review: Family Fun Magazine "Most Rugged Natural Jewelry"

Raise your hand if you get Family Fun, saw this idea in the June/July 2011 magazine, and knew I'd try it? And if your kids are like mine, they LOVE to collect rocks and shells and sticks, and just about everything else. And as if what they find on the ground is not enough, they also like to buy those little bags of polished, colorful rocks at the Zoo Gift Shop. Occasionally, I do let them buy a bag. We had enough collected at one point, that we made stepping stones and used the colorful rocks to decorate around their footprint on the stones.

When I saw the "Most Rugged Natural Jewelry" idea in
Family Fun
, I immediately thought of the newest bag of rocks
we brought home from Ruby Falls.
The idea is to place a small stone at the center of a 15-inch-long piece of colored wire. They, and I, used 22-gauge. But I shortened my piece of wire to 12 inches. Wrap the wire around the rock a few times to secure it. Twist together the ends (don't over twist or you'll break the wire), then wrap the twist around a pencil to form a loop. Use needle-nose pliers to close the loop, then cut off any excess wire. Hang the pendant from a length of leather cord.

A close-up to see the twisting and looping and such.
First I will say, I did this by myself. Both of my girls saw what I was doing and didn't ask to help. But, working with the round, polished stones was difficult, and I know my girls would have become frustrated easily. They are, after all, 4 and 7. I had a hard time keeping the wire in place and keeping the rock from slipping out, and I had to start over on more than one occasion.

I used black wire and black 20lb hemp cord to make this necklace.
I also happened to have a magnetic clasp that I added for closure.
For the blue stone, I used blue wire with a brown leather cord.
The cord is just knotted on the end, so I needed to make sure
it was big enough to fit over their heads.
After working with the polished stones, I raided my daughter's collection of rocks. Some of them are rocks I'm sure she's found outside and others I'm not sure where they came from, but some do look more like they came from a craft store.
This black rock is more flat than the Ruby Falls rocks, and it was so
much easier to work with. I wrapped it with black wire and put it on one of
my braided leather chains.
This brown rock that came home from a playground is also flatter
and was also easier to work with. I wrapped it with black wire and put it on
a necklace we'd gotten from the craft store for a different project.
So all in all, this idea turned out some pretty neat and unique jewelry that will be fun to wear. At least I hope they are wearable... that the wire doesn't slip allowing the rock to fall out. I do recommend, however, that you find rocks that are on the flat side. And perhaps with the flatter rocks, my 7-year-old would be able to join in and make one, too.


"In God is my salvation and my glory: the rock of my strength, and my refuge, is in God."  Psalm 62:7