Philippians 4:13

I can do everything through Him who gives me strength. Philippians 4:13

Sunday, March 25, 2012

The Empty Tomb Garden

Another idea from Pinterest. Another picture. I clicked into the blog to find out more details about it, but the blogger was just showing us a picture. No instructions. So I made up my own...
You'll need potting soil, grass seed, large clay saucer, small clay pot
and saucer, twigs, and twine.
First build three crosses with twigs and twine. Our twigs were pretty
flimsy so we doubled them up, but you could just use
two twigs per cross instead of four.
Next, use potting soil to build a hill inside the large clay saucer.
My saucer is about 12 inches in diameter, and I used about
4 quarts of potting soil. As you build, place the small clay
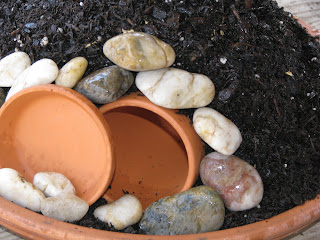
pot into the hill like a cave.
When your hill is mostly made, insert the three crosses,
then add dirt to stabilize them as needed.
Sprinkle grass seed over the hill. I didn't want to buy a huge
bag of seed (though I'm sure our yard could have used it),
so I found a small packet of Cat Grass. Use
a bit more dirt to cover the seeds.
We placed some small stones around the entrance to the cave
and placed the small pot's saucer to the side to show that the
"stone was rolled away."
We're using a spray bottle to gently spray the hill with water
as we don't want to wash it all away as we water our seeds.
And now we wait... I hope Cat Grass grows fast, because I can't wait to share this project with you!

Since we're waiting, I'd thought I'd let you know that at this point my 5-year-old has exclaimed that "this is a cool project, Mom!" My 7-year-old echoed her sentiments. As we built our crosses, hill, and empty tomb, we talked about the story of Jesus' death and resurrection.

First growth!
As the cat grass continues to grow, I'm not at all happy
with the lack of density. So I've found some regular
grass seed that I've added to the dirt. Now we wait
for THAT to grow. Maybe I should have planted weeds.
GAH! Growing things is not my area of expertise.
So the cat grass, though sparse, is needing a mow, and the other
grass is barely starting to show.

Oh... and the white thing in the empty tomb is the folded
up cloth Jesus left behind. I used a piece of paper towel
that I wet and folded and allowed to dry.
I'm getting impatient. I want to share this project with you because it's cool and my kids LOVED LOVED LOVED it. Maybe you'll have better luck with growing your seed. And maybe next time I'll plant some weeds.


Suddenly there was a great earthquake! For an angel of the Lord came down from heaven, rolled aside the stone, and sat on it. His face shone like lightning, and his clothing was as white as snow. The guards shook with fear when they saw him, and they fell into a dead faint. Then the angel spoke to the women. “Don’t be afraid!” he said. “I know you are looking for Jesus, who was crucified. He isn’t here! He is risen from the dead, just as he said would happen. Come, see where his body was lying. And now, go quickly and tell his disciples that he has risen from the dead, and he is going ahead of you to Galilee. You will see him there. Remember what I have told you.” Matthew 28: 2-7


Jesus said to her, "I am the resurrection and the life. He who believes in me will live, even though he dies; and whoever lives and believes in me will never die." John 11:25-26

Thursday, March 22, 2012

Painting Class

It's still Spring Break, but it turned out to be a rain day, so we spent some time painting. My younger daughter just painted what she wanted to paint. But for my older daughter, we decided to do something a little different and more specific. I adapted this idea from something I saw on Pinterest.
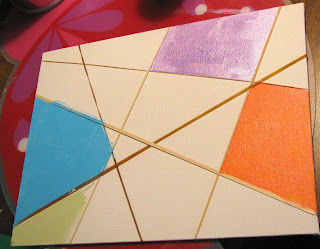
I had an 8x10 paint canvas, and I wrapped it with rubber bands of various thicknesses. The idea I took this from used a much larger canvas and some painters tape. The tape is a much better idea, instead of rubber bands, but I didn't have skinny enough tape for the size of my canvas.

I had my daughter paint into the shapes created by the rubber bands, using several different colors. I tried to get her to use all lighter colors for this part, being careful not to move the rubber bands as she painted.

When the paint was dry, we removed the rubber bands, and they left behind white lines throughout the painting. This would serve as the background for the painting.

Next I had her paint whatever she wanted to paint over top of the color blocks, but his time she needed to use darker colors. She chose to paint a blue bird with a worm in its mouth and a flower.

I also tried to teach her a little about shading. Of course I am no painter and not much of an expert in the area, but she experimented with mixing colors a little and using lighter colors to highlight and define her picture.

Both girls spent a good part of the afternoon working on their paintings. The perfect activity for this rainy day.

My younger daughter's painting


What good will it be for someone to gain the whole world, yet forfeit their soul? Or what can anyone give in exchange for their soul? Matthew 16:26

Wednesday, March 21, 2012

Not Too Crafty Craft Project

It's Spring Break! I have my girls at home with me for a full week, and that means we will be doing a craft project... or two.

Yesterday, our fun didn't involve a lot of extra craftiness on my part. I was recently at the Dollar Store and found little Easter trees on which to hang Styrofoam Easter eggs. I thought the girls would enjoy decorating a tiny Easter tree, so I snatched up a tree and two packs of eggs. I also had some plaster type Easter eggs that I found at Hobby Lobby for the girls to paint.

I called this the "Not Too Crafty Craft Project" because it didn't require much on my part to prepare, as in I didn't actually craft the tree from scratch, or color each Styrofoam egg.
I decided it would be fun, as they were painting their eggs, I would paint the tree's pastel purple pot and make it a bit more eye-catching.
I provided the paints and brushes and let the girls enjoy painting their eggs however they wanted.
Then they decorated the tree.
I put the decorated tree in the kitchen, but it found its way to the girl's bedroom. I think they like it. And I love how much better it looks with the painted pot.
I hung their painted eggs from some greenery by the fireplace.


Praise be to the God and Father of our Lord Jesus Christ! In his great mercy he has given us new birth into a living hope through the resurrection of Jesus Christ from the dead. 1 Peter 1:3

Saturday, March 10, 2012

Sometimes You Just Have To Do Something That You're Afraid To Try

My 2nd grader recently had to give an oral book report in her class and she needed to be in costume. She was Sacajawea. The instructions said that we didn't need to go out and buy a costume as most costumes could be made out of simple items around the house. Easy enough... I remembered an Indian dress with the Halloween stuff that I thought she could still wear. It was made out of a pillow case by her Kindergarten class for a Thanksgiving program. And yes... she can still wear it. But it had the name "Little Eagle" written on it, so while we couldn't use it, I figured I could follow the pattern and make another. Simple stuff, right? But as we went looking for a pillowcase, my daughter indicated that the "girl in the picture on the book has sleeves." And I knew I wouldn't be able to get away with making anything out of a pillowcase. I'm pretty sure I broke out into a sweat as we headed to Joann's to purchase some fabric to make an Indian dress... with sleeves.

Inside I pitched a small tantrum, stamping my feet and yelling "But I don't know how to sew stuff like that!" We're talking a DRESS... WITH SLEEVES! I was really wishing at that moment that I lived closer to my Mom. Or at least paid more attention when she tried to teach me to sew as a kid.

The pressure was on. And my daughter was expecting greatness.

I searched YouTube for a video of a tutorial that might help. I have to SEE it to understand. If I just read instructions for a project like this, I'm not going to get very far. I watched one video that helped me make the neckline for the dress. But I wasn't finding help with sleeves.

Then I found an old stained t-shirt. I ripped out the sleeves at the seams and used them to make a pattern, and as I was tearing it, giving myself a visual idea of how to go about sewing sleeves on the dress. I nervously sewed on the first sleeve, and was delighted to see that it was actually going to look like a proper sleeve. The second sleeve came with more confidence.

While it's not perfect, and I certainly won't be winning any awards, my daughter was thrilled with her dress. And really... that's ALL that matters.

Once the dress was made, my daughter painted a design on the dress,
and we added a peacock feather applique and a belt.
To complete the outfit, we added feather
earrings and hair clips.
For shoes, we glued feathers to a pair
of cheap flip-flops.
My daughter did a fabulous job on her oral book report, and with the help of her costume, got an A+. And what's more, she wants to wear her Indian dress for Halloween this year.

It makes me proud that she was so proud.


From the lips of children and infants you have ordained praise because of your enemies to silence the foe and the avenger. Psalms 8:2

Saturday, March 3, 2012

Recyle Project: Tin Can Wind Chime

I sort of saw this idea on Pinterest... in that I SAW the picture, but I never clicked into the source of the picture. And as I type this, I still haven't clicked into the source of the picture. I know. It's terrible of me to take an idea without actually reading the idea. But to be fair, here's a link to my pin if you want to check it out.


This was a perfect project for this somewhat chilly, lazy Saturday afternoon. Here's how we made ours.
You need tin cans of various sizes, paint, fishing line, plastic beads.
Paint the outside of clean, dry tin cans. For one wind chime, each can needs to be a different size. If you can nest them all inside each other, perfect. We used acrylic craft paint. Be sure to finish with a top coat sealer to protect the paint.
When your cans are dry, drill a small hole in the center of
each can bottom. Or be like me and do it when they're
still a tad wet. You really shouldn't be like me.
Be more patient.
Cut a length of fishing line (or heavy string... but fishing line will last longer) and tie the end of the line to a plastic bead (beads should be larger than the holes in the cans). String into the smallest can so that the bead is inside the can and the can is hanging upside down. String a second bead onto the line and position and secure it so that when you thread the second, next-size-up can onto the string, it will hang to barely hit the can below it. Do this until all cans are strung onto the line, using the beads as anchors for each can. Tie a ring or S-hook to the top of the line so you can hang it.

We made just one wind chime. My daughters and I each painted a can, and the fourth we all painted a little bit on. We plan to hang this wind chime just outside our vegetable garden.

I love having these little reminders of my girls and their creativity and our fun doing this kind of thing together.


Throw off your old sinful nature and your former way of life, which is corrupted by lust and deception. Instead, let the Spirit renew your thoughts and attitudes. Put on your new nature, created to be like God—truly righteous and holy. Ephesians 4:22-24