Philippians 4:13

I can do everything through Him who gives me strength. Philippians 4:13

Monday, February 28, 2011

Painting Wallflowers

A year ago we purchased a loft bed and moved our older daughter from her full-size bed up to the top bunk of the loft, and moved our younger daughter from her toddler bed to the full-size bed under the loft. This meant I got to have some extra fun and buy new bedspreads! I shopped at Overstock and found a bedspread we all liked. We purchased the two different sizes and the required number of shams, but at Overstock, we didn't have choice of much else as far as coordinating things for their room, so we coordinated with color, mostly hot pink. Thankfully, we found bedspreads that matched the existing color of the walls (green), and we didn't have to paint. Then over the months we have added a lot of hot pink to the mix... hot pink sheets, hot pink curtain, hot pink rope lights that we use as a night light, hot pink lamp, small hot pink area rug, etc. 

New bed with new bedspreads, before a lot of hot pink was added.
My older daughter thought it would be neat to paint flowers on the walls, flowers that matched the bedspread. So we did. I started by taking some tissue paper and placing it on the bedspread, and gently tracing the outline of the flowers. I had about four different flowers to choose from, but I picked just three of them. 


I took my tissue paper outlines to work with me, to the university library, and used their ancient opaque machine to enlarge the flowers onto poster board, making sure the flowers were different sizes from one another. I then cut out the flowers, making them my stencils. I used the stencils to draw the flowers onto the walls (I used the white part of my creative memories photo pencil). I grouped three flowers together on one wall, then grouped them again on the opposite wall, but using a different grouping for the second wall. Then we used craft paint and started painting, using colors from the bedspread flowers to match as best we could.

My daughter was SO EXCITED to help paint! And she did a great job.
I think my daughter was a little disappointed at first. She thought we were going to paint LITTLE flowers ALL OVER the walls... all of the walls... completely covering just like on the bedspread. YIKES! I think we'd still be painting to this day! But once we were finished, she was very happy with the outcome.

Wall next to the bed
Opposite wall... and you can see the hot pink polka-dot curtain.
This was so much fun to do with my daughter and my Mom, who came to help us paint. And I love the fact that our artwork will remain on the walls for several years to come, as our choice of bedspread is not something too little girlish that they will outgrow too soon.

"[Jesus] said to them, 'Let the little children come to me, and do not hinder them, for the kingdom of God belongs to such as these.'" Mark 10:14

Friday, February 25, 2011

The Great Rocking Chair Makeover

This rocking chair was given to my oldest (let's call her ACH) when she was a baby by some very kind people... purple to match her bedroom and covered in butterfly/ladybug stickers. They put a clear coat over the stickers, but it didn't take very long for some of them to start peeling off. It had been "put away" for several months. I thought about getting rid of it... almost did. But then we decided to give it a makeover to match their bedroom so it could find a new home in there.

before
ACH's original bedroom had become the playroom, and my little one's (MCH) bedroom was now shared by both girls. The walls in there are green, with hot pink accent, and large flowers painted on the walls (a subject for a future blog, I think). So this purple rocking chair needed a makeover to match the "new" bedroom. I started by sanding off as much of the clear coat as I could to remove stickers and smooth the surface to prepare it for a new coat of paint. Hot pink!

with hot pink coat before adding flowers
Then I used soft flower-shaped paint stamps to decorate the chair. The colors in their bedspread include yellow, light pink, light green, and blue, so those are the colors we used to decorate the chair.

I used paint stamps to randomly add flowers of different shape, size, and color

 
I used a stencil to add a little dark green vine here and there
I then finished with a clear coat to protect the finish. So perhaps you have something that you think doesn't fit in your home anymore, but perhaps it just needs a makeover. Then you have something brand new without the cost. The supplies to makeover this rocking chair did not cost very much... just a little craft paint and some stamps.

Therefore, if anyone is in Christ, he is a new creation; the old has gone, the new has come!  2 Corinthians 5:17

Thursday, February 24, 2011

Rain on My Parade

To say it's raining today would be to understate the situation. But I am thankful for the warmer temperatures so that what's falling from the sky is wet and not white. I love snow, but this MI-->GA-->TN girl has had enough of that for this year. Our weather today makes me think back to the planning of my first grader's 6th Birthday Party. We'd planned to have an outdoor carnival style party. And wouldn't you know the weather did not cooperate. Most of our games were okay to bring indoors, but one in particular I was really disappointed about not being able to do... but wait... could we do it indoors? INDEED!

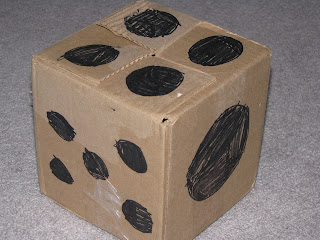
The idea was to use sidewalk chalk to make a giant game board on the sidewalk and driveway, where the children would be the game pieces. My daughter and I used a small cube box and made one large die.


Clearly... I was not going to use sidewalk chalk on the floor in my house, but as I stood in the kitchen trying to think of something, I noticed the floor. LARGE SQUARE TILES. So I got some paper, and on each piece of paper, I wrote an action like "Sit Down," and "Stand on One Leg," and "Run in Place," and "Sing the ABCs," etc. Then I taped a piece of paper in each square tile and created a giant game board that started almost at the front door and ended somewhere in the kitchen. So despite the morning rain (by the time the party started the rain was gone, but my oh my did it bring the humidity. No one would have enjoyed being outside for very long anyway!!), we had a great game and a great party.


I can't post a blog about the party without showing you the cake... though it has a few modifications, this idea came from... you guessed it... familyfun.com.


Thanks for reminiscing with me. Regardless of the weather, remember to thank God for another day to love on those around you.


"This is the day the Lord has made.We will rejoice and be glad in it." Psalm 118:24

Wednesday, February 23, 2011

Magnetize Artwork

If you're like me, you have a lot of artwork to display... masterpieces created by your children. And they are masterpieces. But where do you put all of it? I have some up on the refrigerator, some on the walls in the playroom, some in scrapbooks. You name a place, it's probably there. But here's an idea if you have a small drawing created by your Picasso. Make it a glass magnet... so it can hold up another piece of artwork on the refrigerator.


Items needed: artwork, glass stones, clear drying glue, button magnets.
  • You'll need some round, flat, clear glass stones. You can find a bag of these at the dollar store. Just make sure they're not cloudy or full of bubbles.
  • Scan your child's artwork into your computer and shrink it to a size that when printed will fit behind the stone, about an inch, depending on the size of your stone.
  • Print in color.
And be sure to print extras to make magnets for the Grandparents, too.
 
  • Cut a circle around the artwork. I used my one-inch punch. It was the perfect size. 
  • Use a clear drying glue and spread it lightly over the front of the artwork and place it under the stone, so you can see the artwork through the stone. Press out any air bubbles. Tacky Glue works great... just keep it a thin layer, or better yet get the clear Tacky Glue. E-6000 is another choice, you just have to hold it longer and be extra diligent with bubbles.
  • After it is dry, glue a good, strong button magnet to the back.
     
     
In the picture above, the magnet on the left was a drawing from my older daughter when she was four. This flower was her "signature" drawing for the time. I LOVED it. This one was just a little drawing on a little piece of scrap paper, and I knew I had to keep it. I still have that original piece of paper, but the drawing itself was perfect for a magnet. We made magnets for us, for Grandparents, for teachers... they all got one!

The magnet on the right was made by my preschooler a couple of months ago, and it too was her "signature" drawing, and I thought it was perfect to make a magnet for her, too. And yes... everyone got one.

This project would not work for a full page intensive drawing, but just a small doodle that your child has created that you could envision being the face of a magnet.


"The heavens declare the glory of God; the skies proclaim the work of His hands." Psalm 19:1

Tuesday, February 22, 2011

President's Day Bangles

So our President's Day fun didn't involve a lot of creativity from Mama. The girls painted large wooden bangles they got from their Gran for Christmas. But I was so very impressed with the job they did, I just had to share. Usually my little one just does the whole hit or miss thing with painting. But this time she actually got intentional. The box had a few ideas on the outside, and both girls took off on those ideas and really made some great bangles.


The stack on the left were painted by my first grader. Giraffe print at the bottom. Then jaguar... she mixed the orange paint herself. Then zebra. The top has cougar paws on it, for her school mascot. The package came with stencils they could use, one of them being a paw print. But she decided to paint them herself without the aid of a stencil.

The stack on the right were painted by my preschooler. The bottom has colors she mixed herself, but it made a great reddish-purplish color. The next is her giraffe. Then zebra. The top is red on the outside and blue on the inside. Again, I was really impressed with how intentional she was... especially seeing the zebra and giraffe print examples on the box, and doing it herself.

I think we have a couple of artists in the making!


"Charm is deceptive, and beauty does not last;but a woman who fears the Lord will be greatly praised." Proverbs 31:30

Monday, February 21, 2011

Talking to Myself

Well, since I'm just talking to myself for now... it's been close to a year since I found out there was a chance I would lose my job. At the time, I was reading in Genesis about Sarah, and then Rebekah. Both of these women tried to make God's word come into being on their own. God told Abraham he would be the father of many nations. But Sarah was barren and past child-bearing years. So she gave her servant Hagar to Abraham to bear him a son. She tried to make God's promise come to fruition on her own. Hagar's son was not the son through whom God would work. Sarah herself would have a son, and only God could make that happen. God told Rebekah regarding her twins: "Two nations are in your womb, ... one people will be stronger than the other, and the older will serve the younger." And Rebekah favored her younger son, Jacob, and manipulated Isaac's blessing to make sure Jacob got it.

I am so glad that I was reading these stories during that particular time of my life. Because during the months that followed, I was continually reminded of them. That whatever God is doing in my life, he doesn't need me to try to make things happen. I needed to trust His word, and His will, and His timetable. I have no idea how things are going to work out. Even now that I am officially unemployed, I still don't see it. But I am trusting that God has a plan, that He will lead me to the right place, the right people, the right position, or maybe just the right customers, and it will be in His time, not mine. I don't know, but I am thankful for the peace He has given me and I am ready for the blessing that He has waiting... something far better than I can fathom!

Sunday, February 20, 2011

Will you be my Valentine?

My daughters are 4 and 6. Every year for Valentines, the cards my girls receive, and those given in years past, have been of the store bought variety. This year... we decided to do something a little different. 

First I should say that Family Fun magazine and Familyfun.com are my friend. I am always looking to those sources for ideas for birthday parties and rainy day crafty activities for my kids. I also get email ideas from them, and their Valentine's Day email caught my attention. Homemade Valentines! What a great idea! My girls love to color and cut and draw and write.

I found two ideas that involved pencils. Pencils can be found in the dollar section at Target. And usually they have pencils to match every holiday and season. My first grader found a great Owl card, and we picked a simpler Heart card for my preschooler. 

Now my preschooler LOVES letters, and she is always asking me how to spell a word so she can write it. She doesn't have a handle on HOW to write all 26 letters, but she still does a great job for her age. I guess I got a little over ambitious with her, having her write the entire message of her card. I wrote the message on a separate piece of paper and asked her to copy the message onto her card. She needed 7 for her class. She did 3 and she was done with the task. So for the remaining cards, I wrote the message and she signed her name and added a sticker.

My first grader absolutely loved making her Owls. We had three different messages: "You're a hoot", "I'll owl-ways be your friend", and "You're owl-right." And of course she wrote the messages herself. I helped her cut the head of each Owl and I punched the eyes.


We've decided that homemade Valentines are the way to go from here on out. And my first grader is already planning the theme for next year's cards.


"Three things will last forever—faith, hope, and love—and the greatest of these is love." 1 Corinthians 13:13

Saturday, February 19, 2011

What to say?

I am a wife and a mom. I have never been one to really follow blogs. And I'm not sure how to go about having one of my own worth following. But I think I'll give it a shot. I have worked in radio since 1997 (1991 if we include college days). But that ended in 2011 when my radio station was sold and I was out of work. I have no desire to go back to the "workforce." I just want to be a mom. I am a mom. My daughters are in preschool and first grade. I want to be home with them during their breaks and summers and volunteer in their classes and go on field trips. So here I am crafting things to sell to help pay the bills. I make baby ribbon blankets. I make toddler quilts. I make fabric flower hair accessories. I'm learning to crochet. I want to make hats. Maybe more. A friend said I should blog. What am I going to say? I'm always the quiet one. We shall see...