Philippians 4:13

I can do everything through Him who gives me strength. Philippians 4:13

Monday, December 30, 2013

Terra Cotta Gumball "Machine" Project


Today we made some absolutely adorable Gumball "Machines" using terracotta pots and small fish bowls. Right now, they're holding candy, but later, I'm sure they will hold other things for the girls, like marbles or rocks or whatever they are thinking of collecting.


For this project, you'll need terracotta pots, terracotta saucers (we used a size smaller than the pot), small round fish bowls (sometimes these can be found at the dollar store), and knobs (a package of wooden knobs will work).


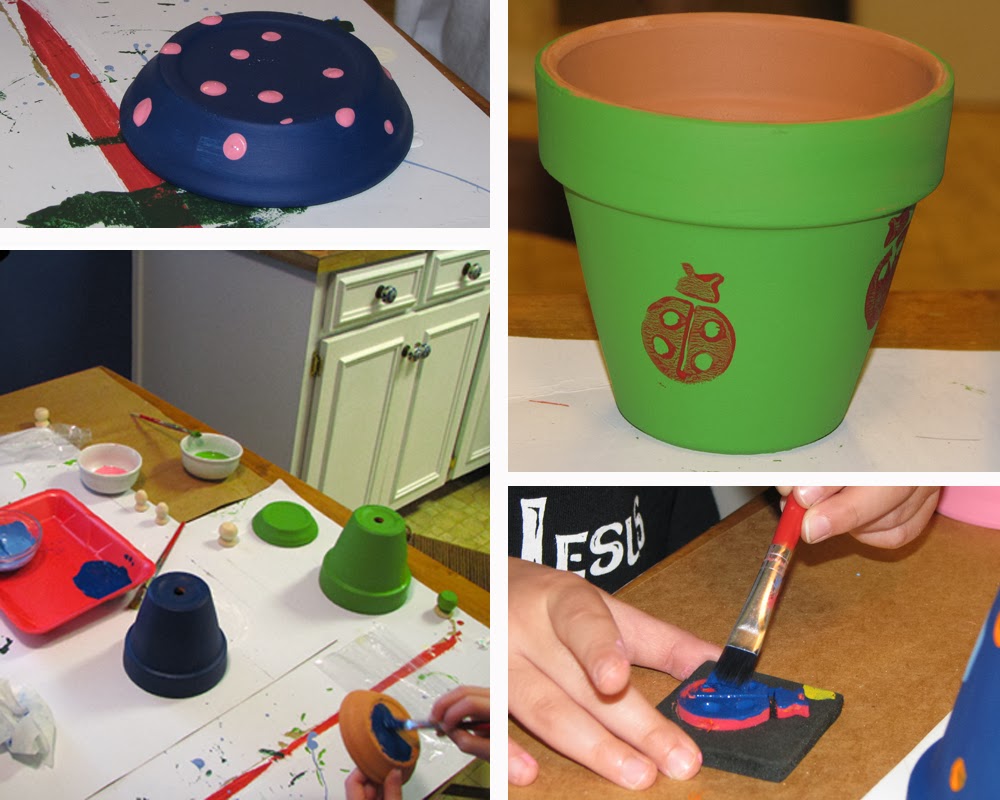
We painted the pots and saucers and then used stamps to decorate the pots with dots and flowers and ladybugs. Oh my!


Glue the fish bowl to the bottom of the upside down pot. We used E6000 glue. Glue the knob to the bottom of the upside down saucer. The saucer becomes the lid for the Gumball Machine. What do you think? Are they not simply adorable?


“For I know the plans I have for you,” declares the Lord, “plans to prosper you and not to harm you, plans to give you hope and a future.” Jeremiah 29:11

Saturday, December 28, 2013

Funnel Christmas Tree Craft Project


What a fun craft Gran had planned for the girls today. We made Christmas trees from a stack of nesting funnels! These are simply too cute not to share.


For each girl, Gran had a set of cone-shaped funnels
in four different sizes.


We painted each first with a coat of Kilz.


When the Kilz was dry, we painted them green.


We used two different colors of green and alternated the colors
for the tree layers.


Then we glued the pieces together to form a tree.


We added a miniature tree topper star.


For ornaments, we glued on plastic gems.


A super simple and cute Christmas
project for the kids to enjoy.


Matthew 1:23 “Behold, the virgin shall conceive and bear a son, and they shall call his name Immanuel” (which means, God with us).

Saturday, December 21, 2013

Adorable Snowman Craft Projects

Christmas Break is here, and that means Christmas baking and crafting at our house. Today we made snowmen. Not the kind involving snow. After all, it was just 70 degrees today.

No. We made ours with paint.

I found these two ideas on Pinterest, and my girls loved the first one best.

FLOWER POT SNOWMAN


I didn't have all the supplies on hand for these cuties, so when I stopped to pick up some flower pots and heads at Hobby Lobby, I couldn't find the size of terra cotta pots I wanted. But I did find a package of small wooden flower pots that were the perfect size and match for the package of wooden balls. Of course the balls have a flattened bottom making them set easily atop the pot.

We used a stash of baby socks for the hats, ribbon for the scarves, and small buttons, all of which I had already in my craft closet. The girls and I painted the pots and balls white, then painted the eyes, nose and mouths. 

Tip: We used the wrong end of the paint brush to make dots for the eyes and mouth.

We made the hats by cutting the foot from the sock and tying at the top to form into a knit hat. We tied the ribbon around the neck for the scarf and glued on the buttons.

It was an easy and fun project for our rainy Saturday afternoon.


When I was at Hobby Lobby looking for the items for the above project, I also found a package of wooden spools.

How did I not know they sold these things??

I remembered seeing a project using spools for snowmen ornaments and I couldn't resist.

WOODEN SPOOL SNOWMEN


I'm not totally sure why, but I really like the spool projects I see on Pinterest. And this one is super adorable. We painted the spools white and then I distressed mine with sandpaper. The girls didn't want to do that part on theirs. We used ribbon to thread the spools.

Tip: Wider ribbon works best.

Each ribbon is knotted at the bottom of the ribbon and then knotted again just under the bottom spool, knotted between each spool and finally knotted above the top spool. Any extra ribbon can be used to create a loop for hanging on the tree.

Finally we painted our faces and buttons.

If the ribbon is too narrow, the knots may not be big enough to hold the spools in place. For one of our snowmen, I had to add a bit of glue to keep the spools between the knots. This may also be necessary if the spools want to rotate around the ribbon instead of staying lined up with each other.


He's a perfect fit with the other ornaments on our tree.

Merry Christmas, 2013! And may you have a blessed 2014.


For to us a child is born, to us a son is given, and the government will be on his shoulders. And he will be called Wonderful Counselor, Mighty God, Everlasting Father, Prince of Peace. Isaiah 9:6

Thursday, December 19, 2013

The Amazing Christmas Race

My family started watching The Amazing Race this year. We didn't intend to watch it, it just so happened we saw the first episode of the season and the girls asked if we could set it up on the DVR. They wanted to see the race to the finish.

We (I) enjoyed it much more that I thought we (I) would as we celebrated wins and mourned losses.

This Christmas, we have two over-sized gifts for the girls that will be difficult to wrap. Both items are shared gifts and neither will belong to one child over the other. For a little Christmas morning fun, and as a way to present these gifts, I created a scavenger hunt for them in the style of The Amazing Race.

When they get up Christmas morning, they'll each unwrap the gifts they find under the tree. As they finish, they will discover one final gift, wrapped in yellow paper with a red ribbon that they must open together. Inside this package, they will find the first piece to the game, complete with my feeble attempt to rhyme.


The first clue will send them to another room where they must search for the next clue, which includes a little treat.


The new clue sends them to yet another room where they must search for the next clue, but instead they will find a Detour.


Inside those two packages, they will find small Lego Friends sets. The Detour requires them to each build the Lego Friends set, and when they have both completed the task correctly, they will receive the next clue.

That clue will send them to yet another room where they will find a clue that sends them to another room. And there they will find a Road Block.


This Road Block invites them to the fireplace where they will see what treasure can be found inside their stockings. When they have finished with their stockings, they will receive the next clue.

This final clue takes them back to the Christmas Tree where they will discover their final two "big" gifts.

I hope they enjoy their Amazing Christmas Race as much as I enjoyed putting it together, with fond memories of our Christmas fun for the rest of their lives.


Luke 2: 8-16
And there were shepherds living out in the fields nearby, keeping watch over their flocks at night. An angel of the Lord appeared to them, and the glory of the Lord shone around them, and they were terrified. But the angel said to them, “Do not be afraid. I bring you good news that will cause great joy for all the people. Today in the town of David a Savior has been born to you; he is the Messiah, the Lord. This will be a sign to you: You will find a baby wrapped in cloths and lying in a manger.” Suddenly a great company of the heavenly host appeared with the angel, praising God and saying, “Glory to God in the highest heaven, and on earth peace to those on whom his favor rests.” When the angels had left them and gone into heaven, the shepherds said to one another, “Let’s go to Bethlehem and see this thing that has happened, which the Lord has told us about.” So they hurried off and found Mary and Joseph, and the baby, who was lying in the manger. 

Monday, December 16, 2013

Our Clay Ornament Fail, Sort Of

Each year for Christmas, we make something to give as a gift for friends, family and teachers. Sometimes it's something we bake, sometimes an ornament we make. When I think about the clay ornaments we made this year, this is how I feel...


I guess they weren't all THAT bad, but they certainly didn't turn out as amazing as I had imagined. Really... my calling it a fail was simply because the result didn't meet my own personal expectations. We still gave the best ones as gifts, so it really wasn't a complete fail.

These are the clay ornaments we tried to make - click the link for instructions if this looks like something you'd like to try. They are just so plain and simple and I really loved them. Or I love hers. Hers look so perfectly round and perfectly stamped and perfect.


I have never really worked with this type of clay before (oven bake clay). My older daughter didn't like the feel of the clay in her hands, so she did not stick with the project. My younger daughter and my neighbor's granddaughter who happened to be over stuck with the project and helped roll, cut and stamp ornaments. They enjoyed it, so I guess that's the important part.

I was disappointed to discover that I ruined my pastry roller. If you decide to work with this type of clay, do not use utensils you want to continue to use for food. The blogger did not mention that in her post (and it was not mentioned on the clay packaging), but I noticed later that it was mentioned down in the comments, which I did not read until after we'd done it. Really... I'm not disappointed. I'm kinda mad. But it's just a pastry roller and not worth the effort of being mad.


So these are some of ours. Actually they're the worst of ours, because I have already given away the best of them. Some of them are very obviously not the same thickness around. Some of them have the stamp too light, or pushed in too heavy. I guess we didn't HAVE to bake all of them, because we could clearly see how they would turn out. Baking them didn't change how they looked. So I guess we could have scrapped some of them and started over. And in some cases we did.

I know... I'm being too hard on myself. And I wanted it to be a project the girls helped me with, not a project by myself simply so they could meet my personal level of perfection. But I did have quite a few that I didn't feel were okay to give as gifts.


However, these three were perhaps my favorite, so they ended up on my tree. We were running out of clay and instead of cutting perfect circles (for the two on the left), I just slapped a little clay on the table and stamped it. Strange how these imperfect ones became my favorite. Maybe we should have skipped the round cookie cutter and done them all that way. 

The one on the right was a bigger circle with a larger stamp, and I thought it turned out pretty nice, too. These were the kind we gave away.

Merry Christmas!


How blessed is God! And what a blessing he is! He’s the Father of our Master, Jesus Christ, and takes us to the high places of blessing in him. Long before he laid down earth’s foundations, he had us in mind, had settled on us as the focus of his love, to be made whole and holy by his love. Long, long ago he decided to adopt us into his family through Jesus Christ. (What pleasure he took in planning this!) He wanted us to enter into the celebration of his lavish gift-giving by the hand of his beloved Son. Ephesians 1:4-6


Saturday, November 9, 2013

Turkey Wreath

I admit. I listened to Christmas music all day today. And I admit it was not the first time I've had it on this season. I admit I enjoy looking at all the Christmas decorations as soon as they come out. And though our neighbors have already decorated their yard, much of it even before Halloween, I'm not ready to decorate my own house yet. And I decided I needed a Thanksgiving wreath for my front door.

I remember the Snowman Wreaths we made not long ago, and I thought it might be fun to make a Turkey Wreath for Thanksgiving.


To make our wreath, we purchased a small grapevine wreath and some feathers. The rest of the materials I had at home, some pipe cleaner, a brown sock, pom-pom, stuffing, felt and a pilgrim hat.


For the tail, we simply stuck orange, red and yellow feathers into the grapevine. I used a bit of hot glue to secure them.


For his head, we stuffed a brown sock. We attached it with a piece of pipe cleaner. I trimmed a yellow pom-pom into a beak shape and used red felt for the waddle. I intended to find a craft pilgrim hat, but I found a small box and used some pipe cleaner to build a hat.


We used more pipe cleaners to make feet.


And this is our final product. He turned out pretty cute and will make a great Thanksgiving addition to our front door until it's time to replace him with our Christmas Wreath (the snowman).


Praise the LORD. Give thanks to the LORD, for he is good; his love endures forever. Psalm 106:1

Monday, October 28, 2013

Recycled Aluminum Can Halloween Wind Socks

My oldest daughter told me the other day, "wouldn't it be neat if we could make some Halloween things like those things we made at Church?" She was talking about the paper wind socks we made during our lesson about Jesus calming the wind and rain.

So that got me to thinking about how we could put together a fun Saturday afternoon project to make some Halloween decorations.


This Halloween project using stuff we found around the house turned into cute wind socks for our front porch. I gathered some aluminum cans, ribbon, beads, and paint for our project.


I started with some soup cans, the kind with the pull tabs so we wouldn't have to worry about the sharp edges from the can opener. I drilled holes around the top edges of the cans, near the open end, and another hole in the center of the bottom of the can.


Then we painted.


My oldest made Frankenstein.


My youngest a four-eyed monster.


While we waited for the paint to dry, we chose thin ribbons and strung some pony beads on them, just for a little decoration.


The ribbons were threaded through the holes in the can and knotted on the inside to keep them secure.


We threaded another ribbon at the top (or bottom of the can) as a holder.


And now they adorn our front porch. My oldest said, "finally some Halloween decorations for our house!" I guess our 3 carved Jack-o-lanterns wasn't enough for her taste.


Jesus Calms the Storm - Mark 4:35-41
That day when evening came, he said to his disciples, “Let us go over to the other side.” Leaving the crowd behind, they took him along, just as he was, in the boat. There were also other boats with him. A furious squall came up, and the waves broke over the boat, so that it was nearly swamped. Jesus was in the stern, sleeping on a cushion. The disciples woke him and said to him, “Teacher, don’t you care if we drown?” He got up, rebuked the wind and said to the waves, “Quiet! Be still!” Then the wind died down and it was completely calm. He said to his disciples, “Why are you so afraid? Do you still have no faith?” They were terrified and asked each other, “Who is this? Even the wind and the waves obey him!”

Wednesday, August 28, 2013

Bottle Cap Wind Chime

If you've been on Pinterest, you've probably seen many variations of Bottle Cap Wind Chimes. That's where I first saw one and I fell in love with the idea.

Then I saw one at Hobby Lobby. But why buy one at Hobby Lobby when it's so much more fun to make one?


I had quite the stash of bottle caps, and I combined them with bits of chain and beads from a necklace to make my very own one-of-a-kind wind chime.

I used a drill to make two holes on opposite
sides of each cap.


However, I discovered later that it would have been easier to just use a hammer and nail to achieve a smaller and cleaner hole without sharp pieces of metal sticking out.

I took apart a necklace like this one to add beads and bits
of chain among the caps.
I used 24 gauge wire to connect the caps to each other
and to the pieces of necklace chain.
I hung the strips of caps and beads from an old trivet.

It looks like it could be time consuming, but it really wasn't. The girls didn't want to help me with this project, but they stopped their play every now and then to check on my progress and tell me how nice it was looking.


For behold, he who forms the mountains and creates the wind, and declares to man what is his thought, who makes the morning darkness, and treads on the heights of the earth— the Lord, the God of hosts, is his name! Amos 4:13 

Thursday, August 22, 2013

Craft Review: Doll Making Kit by 4M

The girls and I were at JoAnn's the other day. The store is moving to a new location, so they've been clearancing their stock. Is "clearancing" a word? Doesn't matter. I'm going to use it anyway.

We found two Doll Making Kits made by 4M. A Mermaid and a Princess.


The girls were very excited for this find and wanted to make them as soon as we got home. So we set to it.

Each kit contained a stuffed fabric doll, yarn for hair, pieces of fabric for clothes, beads and string. And double-sided tape to hold everything together. **insert snicker** Because double-sided tape is perfect to hold on a doll's clothes.

We followed the instructions. My 9 year-old working on her doll with me working on my 6 year-old's doll while she played with the materials.

Side note: the box indicates this project is for ages over 8. And I totally agree. Actually, I might even up the age. Because even I found the project frustrating.

We made the hair first. That part was pretty easy. But when it came time to add the clothes, it was evident from the get-go that this was NOT going to work. Using double-sided tape to hold pieces of fabric together in small places? NOT! I had to resort to fabric glue, and after gluing a section, using straight pins to hold everything together until the glue was dry, because no one wanted to hold it with their fingers.

After we ditched the double-sided tape and started using glue, the job became less stressful. And more messy. I was peeling dried glue off my fingers for a few hours after. But we were able to get the job done and there's no chance these dolls will lose their clothing.

I give this craft project a C+ because we did end with some very cute dolls, and the girls were happy with the finished project. My 9 year-old did about 75% of the work on her doll, and I helped with 25%, mostly the gluing and pinning part. It was also a lesson for her on following instructions, because she made a few critical errors -- she had to cut fabric to make her mermaid tail and she didn't pay attention to laying out the pattern before cutting -- but we were able to work with it in spite of her mistakes and you wouldn't know if I didn't tell you. My 6 year-old did about 10% of the work, and I did the rest.

And despite the frustrations felt by all, they were ready to head back to the store and get the fairy and the ballerina. So I guess that says something. Should we ever find ourselves in possession of the fairy and the ballerina, the double-sided tape will go to the trash first thing, no questions asked. Actually, I'd probably save it for the next paper project.


Therefore I tell you, do not be anxious about your life, what you will eat or what you will drink, nor about your body, what you will put on. Is not life more than food, and the body more than clothing? Look at the birds of the air: they neither sow nor reap nor gather into barns, and yet your heavenly Father feeds them. Are you not of more value than they? And which of you by being anxious can add a single hour to his span of life? And why are you anxious about clothing? Consider the lilies of the field, how they grow: they neither toil nor spin, yet I tell you, even Solomon in all his glory was not arrayed like one of these. Matthew 6:25-34

Saturday, June 8, 2013

Egg Carton Math

A month before school finished, my 3rd grader informed me she needed to take an empty egg carton to school. Knowing that I buy the larger cartons that hold 18 eggs, she told me she needed her carton to be just a dozen. Even though I didn't really need them at the time, I purchased a dozen eggs on my next trip to the grocery store. 

Don't worry, we ate them before any had time to spoil.

And I love what she brought back home on the last day of school. A game for practicing her multiplication.

1 times 7 equals 7. Maybe I should have made sure it was
on a more difficult problem before snapping a photo.

Her teacher had students randomly number each section 1 through 12. Each child got two dry Lima beans in their carton. To practice their multiplication, they close the carton and shake it. When they open the carton, they find the numbers where the Lima beans landed and multiply those numbers.

Close. Shake. Compute. Repeat.

Genius.

If you don't have dry Lima beans handy, use small rocks or beads. If your child isn't ready for multiplication, use it for addition. 


All Scripture is breathed out by God and profitable for teaching, for reproof, for correction, and for training in righteousness. 2 Timothy 3:16 

Tuesday, May 28, 2013

Flower Pot Candle Holders

Each year, the girls make a handmade gift for their teachers. This year, we found out each teacher's favorite colors and made candle holders from terracotta pots. My girls LOVE to paint, so this was really fun for them.

We also asked for our teacher's favorite fragrances and
purchased candles for their new holders.

We started with some small terracotta pots, patio paint,
and (optional) stencils.

We painted the outside of the pots and both sides of the
saucer, then decorated them with our stencils.

There are two ways to create a candle holder.

One way is to have the pot right side up and place the
saucer right-side up inside the top of the pot.
If you plan to make one like this, just be sure
when you purchase your pots the saucer nestles
inside the pot properly.

Another way is to turn the pot upside down and
place the saucer right-side up on top of it.

Be sure to apply a couple coats of clear varnish/sealant when you're done decorating the pots, then glue the saucer to the pot. We used E-6000 glue for a secure bond.


We made several candle holders, some with stenciled designs, some with free-hand designs. I let the girls make the choices of how they would decorate pots for their own teachers. I also had them write a little note of thanks to their teacher inside the pot, with their name and date.

These would make a cool gift for just about anyone!


Show yourself in all respects to be a model of good works, and in your teaching show integrity, dignity. Titus 2:7